How to use Navigation Graph | Android Studio| Kotlin
Hi, I’m taking the time to share this little knowledge for Android Studio since I felt that there is not much information about it, it should be noted that this has official documentation , what I’m trying here it’s to explain how I would have wanted someone to explain to me, we are going to see the following topics:
A fast guide to navigate
- Create a new Android Studio project
- Adding required dependencies
- Quick explanation about Navigation Graph
- How to navigate from one destiny of your app to another
You will need a basic knowledge about Android Studio to understand some things here, but don’t worry I will explain step by step. Let’s go!
Creating a new project
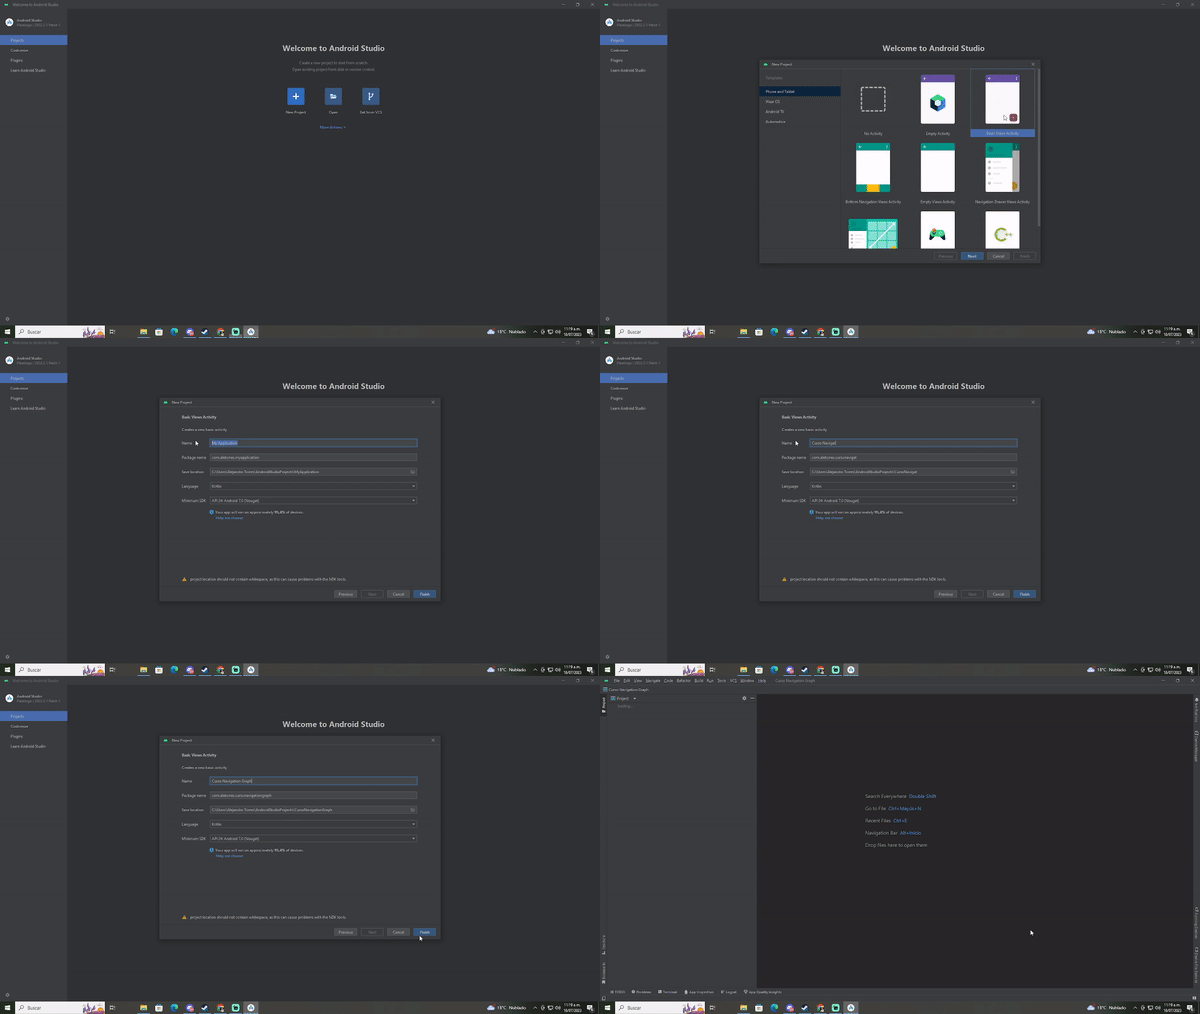
Open Android Studio click on New > New Project > Basic Views Activity
The name of our project will be: Navigation Graph Course, then we do click on finish.
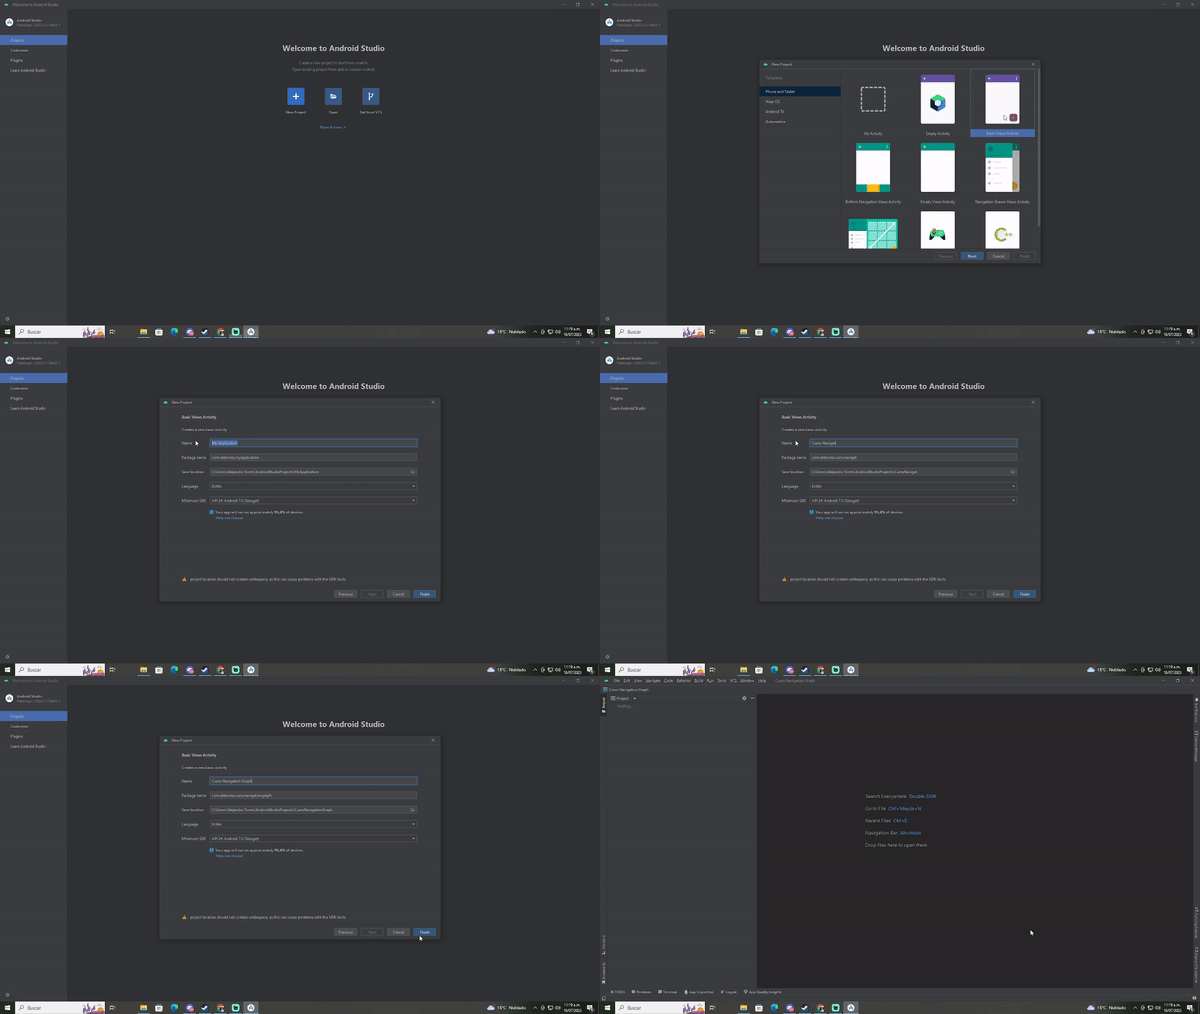
Figure 1. Example: creating a new project
Files for this example
Doing the previous step will create some files for you, let´s describe then: Inside your package folder:
- FirstFragment.kt
- MainActivity.kt
- MainFragment.kt
- SecondFragment.kt
Inside res/layout folder:
- activity_main.xml
- content_main.xml - we will delete this one and we will create another called: fragment_main.xml, I’ll explain how to do it later on this post.
- fragment_first.xml
- fragment_second.xml
Let’s edit some files, copy and paste the content of every file: activity_main.xml content:
<?xml version="1.0" encoding="utf-8"?>
<androidx.constraintlayout.widget.ConstraintLayout xmlns:android="http://schemas.android.com/apk/res/android"
    xmlns:app="http://schemas.android.com/apk/res-auto"
    xmlns:tools="http://schemas.android.com/tools"
    android:layout_width="match_parent"
    android:layout_height="match_parent"
    app:layout_behavior="@string/appbar_scrolling_view_behavior">
    <androidx.fragment.app.FragmentContainerView
        android:id="@+id/fragmentContainerView"
        android:name="androidx.navigation.fragment.NavHostFragment"
        android:layout_width="match_parent"
        android:layout_height="match_parent"
        app:defaultNavHost="true"
        app:layout_constraintBottom_toBottomOf="parent"
        app:layout_constraintEnd_toEndOf="parent"
        app:layout_constraintStart_toStartOf="parent"
        app:layout_constraintTop_toTopOf="parent"
        app:navGraph="@navigation/nav_graph" />
</androidx.constraintlayout.widget.ConstraintLayout>
Let’s create a new fragment called fragment_main.xml:
Follow this steps:
- Right click in java package > New > Fragment > Blank.
- A dialog will shouw up then we write this on the name field: MainFragment, and to the layout file name we go with: fragment_main.xml.
- Click on finish and go!

Figure 2. Example: creating a new fragment
fragment_main.xml content:
<androidx.constraintlayout.widget.ConstraintLayout xmlns:android="http://schemas.android.com/apk/res/android"
    xmlns:app="http://schemas.android.com/apk/res-auto"
    xmlns:tools="http://schemas.android.com/tools"
    android:layout_width="match_parent"
    android:layout_height="match_parent"
    app:layout_behavior="@string/appbar_scrolling_view_behavior">

    <Button
        android:id="@+id/go_to_first_fragment"
        android:text="Go to first fragment"
        android:layout_width="wrap_content"
        android:layout_height="wrap_content"
        app:layout_constraintBottom_toBottomOf="parent"
        app:layout_constraintEnd_toEndOf="parent"
        app:layout_constraintStart_toStartOf="parent"
        app:layout_constraintTop_toTopOf="parent" />

    <Button
        android:id="@+id/go_to_second_fragment"
        android:layout_width="wrap_content"
        android:layout_height="wrap_content"
        android:text="Go to second fragment"
        app:layout_constraintBottom_toBottomOf="parent"
        app:layout_constraintEnd_toEndOf="parent"
        app:layout_constraintStart_toStartOf="parent"
        app:layout_constraintTop_toBottomOf="@+id/go_to_first_fragment"
        app:layout_constraintVertical_bias="0.0" />
</androidx.constraintlayout.widget.ConstraintLayout>
fragment_first.xml content:
<?xml version="1.0" encoding="utf-8"?>
<androidx.core.widget.NestedScrollView xmlns:android="http://schemas.android.com/apk/res/android"
    xmlns:app="http://schemas.android.com/apk/res-auto"
    xmlns:tools="http://schemas.android.com/tools"
    android:layout_width="match_parent"
    android:layout_height="match_parent"
    tools:context=".FirstFragment">

    <androidx.constraintlayout.widget.ConstraintLayout
        android:layout_width="match_parent"
        android:layout_height="match_parent"
        android:padding="16dp">

        <Button
            android:id="@+id/back_button"
            android:layout_width="wrap_content"
            android:layout_height="wrap_content"
            android:layout_marginTop="24dp"
            android:text="Back"
            app:layout_constraintBottom_toTopOf="@id/textview_first"
            app:layout_constraintEnd_toEndOf="parent"
            app:layout_constraintStart_toStartOf="parent"
            app:layout_constraintTop_toTopOf="parent" />

        <TextView
            android:id="@+id/textview_first"
            android:layout_width="wrap_content"
            android:layout_height="wrap_content"
            android:layout_marginTop="16dp"
            android:textSize="24sp"
            android:text="First fragment, you made it!"
            app:layout_constraintBottom_toBottomOf="parent"
            app:layout_constraintEnd_toEndOf="parent"
            app:layout_constraintStart_toStartOf="parent"
            app:layout_constraintTop_toBottomOf="@id/back_button" />
    </androidx.constraintlayout.widget.ConstraintLayout>
</androidx.core.widget.NestedScrollView>
fragment_second.xml content:
<?xml version="1.0" encoding="utf-8"?>
<androidx.core.widget.NestedScrollView xmlns:android="http://schemas.android.com/apk/res/android"
    xmlns:app="http://schemas.android.com/apk/res-auto"
    xmlns:tools="http://schemas.android.com/tools"
    android:layout_width="match_parent"
    android:layout_height="match_parent"
    tools:context=".SecondFragment">

    <androidx.constraintlayout.widget.ConstraintLayout
        android:layout_width="match_parent"
        android:layout_height="match_parent"
        android:padding="16dp">

        <Button
            android:id="@+id/back_button"
            android:layout_width="wrap_content"
            android:layout_height="wrap_content"
            android:layout_marginTop="24dp"
            android:text="Back"
            app:layout_constraintBottom_toTopOf="@id/textview_second"
            app:layout_constraintEnd_toEndOf="parent"
            app:layout_constraintStart_toStartOf="parent"
            app:layout_constraintTop_toTopOf="parent" />

        <TextView
            android:id="@+id/textview_second"
            android:layout_width="wrap_content"
            android:layout_height="wrap_content"
            android:layout_marginTop="16dp"
            android:textSize="24sp"
            android:text="Second fragment, You made it!"
            app:layout_constraintBottom_toBottomOf="parent"
            app:layout_constraintEnd_toEndOf="parent"
            app:layout_constraintStart_toStartOf="parent"
            app:layout_constraintTop_toBottomOf="@id/back_button" />
    </androidx.constraintlayout.widget.ConstraintLayout>
</androidx.core.widget.NestedScrollView>
Now let’s go with the kotlin files:
IMPORTANT NOTE: If you are copying and pasting keep in mind that your package name may be different from what we use for this examples so replace com.aletorres.navigationgraphcourse with your proper package name. MainActivity.kt: The screen main activity, content:
package com.aletorres.navigationgraphcourse

import android.os.Bundle
import androidx.appcompat.app.AppCompatActivity
import androidx.core.view.WindowCompat
import com.aletorres.navigationgraphcourse.databinding.ActivityMainBinding

class MainActivity : AppCompatActivity() {

    private lateinit var binding: ActivityMainBinding

    override fun onCreate(savedInstanceState: Bundle?) {
        WindowCompat.setDecorFitsSystemWindows(window, false)
        super.onCreate(savedInstanceState)

        binding = ActivityMainBinding.inflate(layoutInflater)
        setContentView(binding.root)
    }
}MainFragment.kt: this file is associated with the layout file: fragment_main.xml, we created this on a previous step, content:
package com.aletorres.navigationgraphcourse

import android.os.Bundle
import androidx.fragment.app.Fragment
import android.view.LayoutInflater
import android.view.View
import android.view.ViewGroup
import androidx.navigation.fragment.findNavController
import com.aletorres.navigationgraphcourse.databinding.FragmentMainBinding

class MainFragment : Fragment() {
    private lateinit var binding: FragmentMainBinding

    override fun onCreateView(
        inflater: LayoutInflater, container: ViewGroup?,
        savedInstanceState: Bundle?
    ): View? {
        binding = FragmentMainBinding.inflate(inflater, container, false)
        binding.goToFirstFragment.setOnClickListener{
            findNavController().navigate(R.id.action_mainFragment_to_FirstFragment) // This function makes possible the navigation
        }
        binding.goToSecondFragment.setOnClickListener {
            findNavController().navigate(R.id.action_mainFragment_to_SecondFragment) // This function makes possible the navigation
        }
        return binding.root
    }
}
FirstFragment.kt: this file is associated with the layout file: fragment_first.xml, content:
package com.aletorres.navigationgraphcourse

import android.os.Bundle
import androidx.fragment.app.Fragment
import android.view.LayoutInflater
import android.view.View
import android.view.ViewGroup
import androidx.navigation.fragment.findNavController
import com.aletorres.navigationgraphcourse.databinding.FragmentFirstBinding

class FirstFragment : Fragment() {

    private lateinit var binding: FragmentFirstBinding

    override fun onCreateView(
        inflater: LayoutInflater, container: ViewGroup?,
        savedInstanceState: Bundle?
    ): View? {
        binding = FragmentFirstBinding.inflate(inflater, container, false)
        return binding.root
    }

    override fun onViewCreated(view: View, savedInstanceState: Bundle?) {
        super.onViewCreated(view, savedInstanceState)

        binding.backButton.setOnClickListener {
            findNavController().navigate(R.id.action_FirstFragment_to_mainFragment) // This function makes possible the navigation
        }
    }
}SecondFragment.kt: this file is associated with the layout file: fragment_second.xml, content:
package com.aletorres.navigationgraphcourse

import android.os.Bundle
import androidx.fragment.app.Fragment
import android.view.LayoutInflater
import android.view.View
import android.view.ViewGroup
import androidx.navigation.fragment.findNavController
import com.aletorres.navigationgraphcourse.databinding.FragmentSecondBinding

class SecondFragment : Fragment() {

    private lateinit var binding: FragmentSecondBinding

    override fun onCreateView(
        inflater: LayoutInflater, container: ViewGroup?,
        savedInstanceState: Bundle?
    ): View? {

        binding = FragmentSecondBinding.inflate(inflater, container, false)
        return binding.root
    }

    override fun onViewCreated(view: View, savedInstanceState: Bundle?) {
        super.onViewCreated(view, savedInstanceState)

        binding.backButton.setOnClickListener {
            findNavController().navigate(R.id.action_SecondFragment_to_mainFragment) // This function makes possible the navigation
        }
    }
}
That’s it for now with the files
Set up your environment
Please let’s include navigation support in your project, let’s copy this code into your app/build.gradle file:
dependencies {

  implementation 'androidx.core:core-ktx:1.8.0'
  implementation 'androidx.appcompat:appcompat:1.6.1'
  implementation 'com.google.android.material:material:1.5.0'
  implementation 'androidx.constraintlayout:constraintlayout:2.1.4'
  implementation 'androidx.navigation:navigation-fragment-ktx:2.7.0'
  implementation 'androidx.navigation:navigation-ui-ktx:2.7.0'
  testImplementation 'junit:junit:4.13.2'
  androidTestImplementation 'androidx.test.ext:junit:1.1.5'
  androidTestImplementation 'androidx.test.espresso:espresso-core:3.5.1'

  def nav_version = "2.5.3"

  // Java language implementation
  implementation "androidx.navigation:navigation-fragment:$nav_version"
  implementation "androidx.navigation:navigation-ui:$nav_version"

  // Kotlin
  implementation "androidx.navigation:navigation-fragment-ktx:$nav_version"
  implementation "androidx.navigation:navigation-ui-ktx:$nav_version"

  // Feature module Support
  implementation "androidx.navigation:navigation-dynamic-features-fragment:$nav_version"

  // Testing Navigation
  androidTestImplementation "androidx.navigation:navigation-testing:$nav_version"

  // Jetpack Compose Integration
  implementation "androidx.navigation:navigation-compose:$nav_version"
}
This way we ensure that we have the required dependencies.

Figure 3. Example of the build.gradle file after adding required components.
IMPORTANT NOTE: Sync the project dependencies after this step.
Navigation Graph
The navigation occurs between the app destiny’s, those destiny’s, are connected by actions.
A Navigation Graph it’s a file that contains all your destiny’s and actions.
A bit of theory before continuing:
What is a destiny?
Can be a view of your application, for example: a fragment that has your logic to log into your application or a welcome page or a dashboard, etc.
What is an action?
They are logical connections between your destinations, they represent the path that users can take in your app.
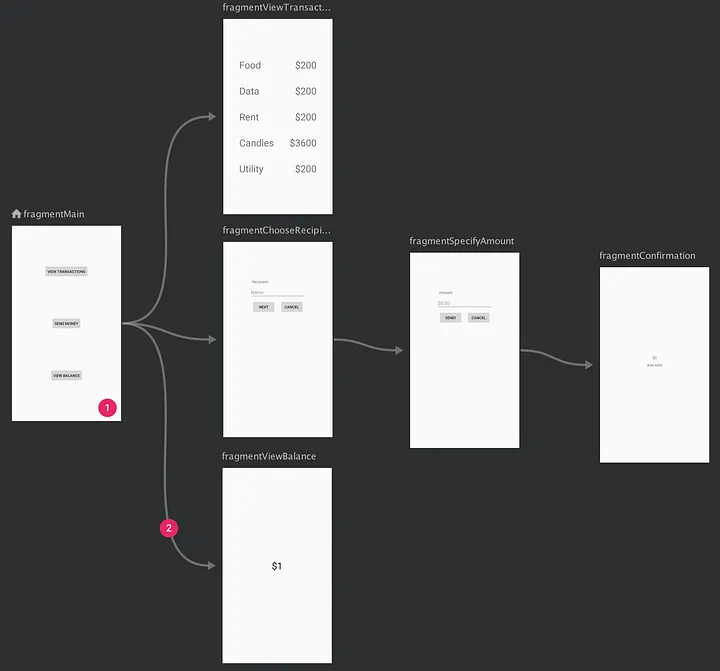 Figure 4. Example of Navigation Graph that shows a preview for six differents destinations that are connected between five actions
Navigation Graph Edition
When created the new project a file called nav_graph located in the res/navigation folder was created by the basic views activity template, let’s go to file nav_graph.xml . Let’s go to the nav_graph.xml file location please double left click on this file, after that we should be on the navigation graph screen, do click on New Destination and select our three fragments one by one:
- MainFragment
- FirstFragment
- SecondFragment
Let’s follow this graphical example to create our destinations and actions:
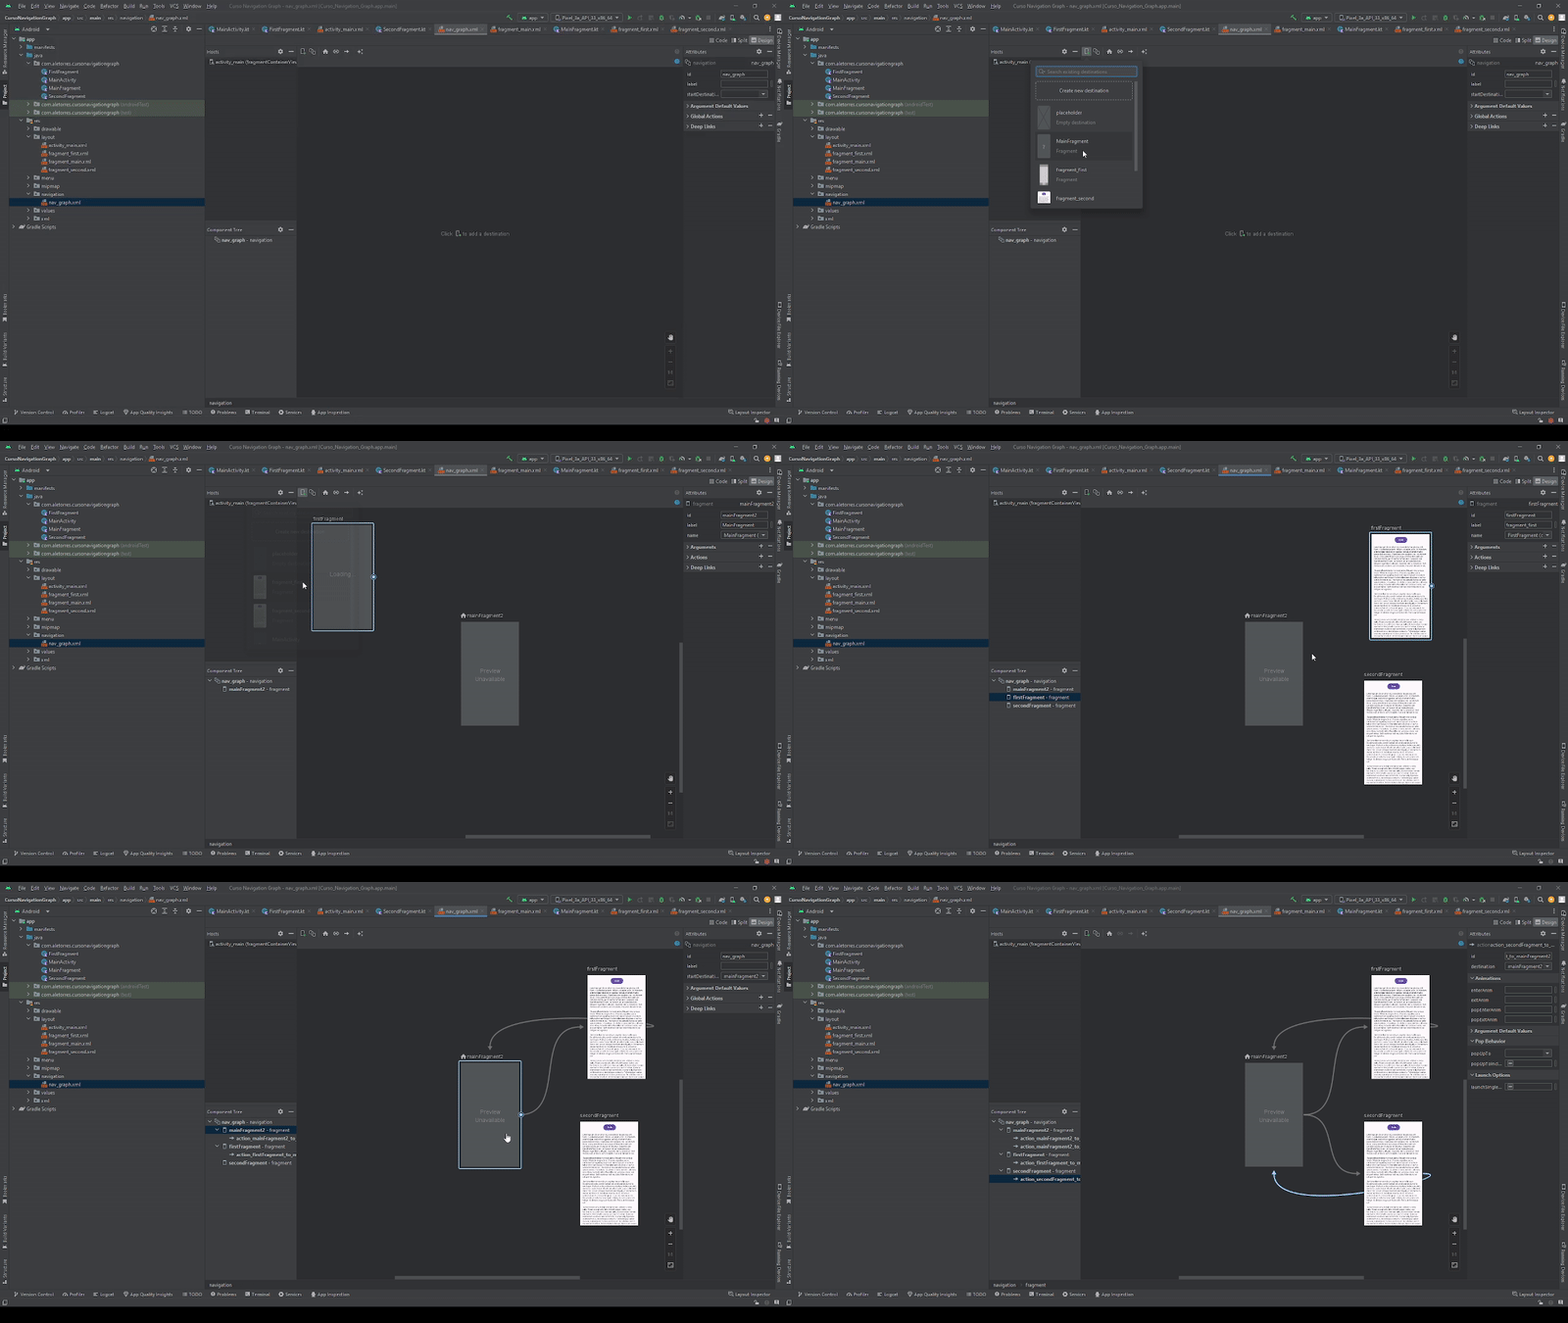 Figure 5. Adding destinations and creating actions on Android Studio
Now for the final step let’s see the result of following all this step by step by running our app in Android Studio.
The result
Probably we missed some previous step ( shit happens hehe ), just in case I made a repo just for this navigation graph example, there you will find all the source code that’s being used for this post.
https://github.com/IIalejoII/navigation-graph-course
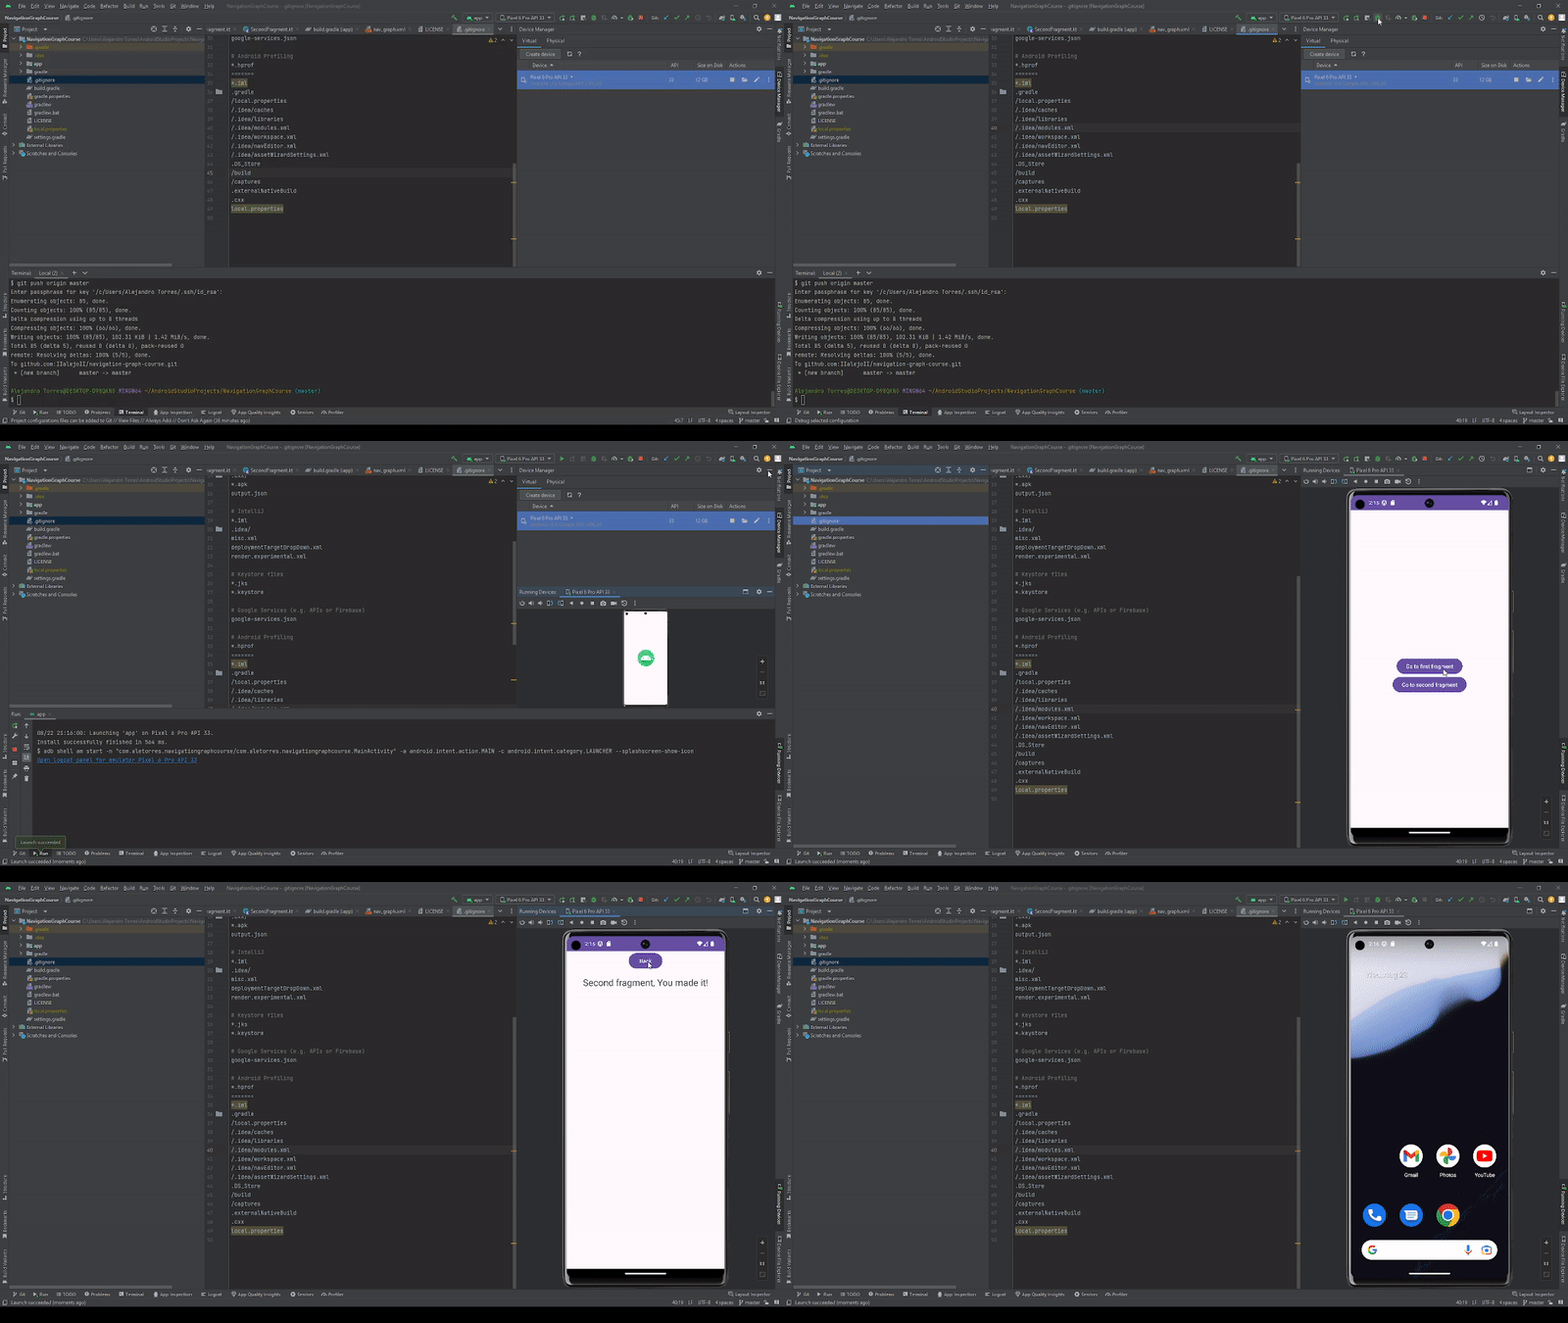 Figure 6. Testing application
Thank you for your time!